Thursday, 25 October 2012

POST TO MULTIPLE FACEBOOK GROUPS OR PAGES AT ONCE


Facebook Is No.1 Social Site All Over The World And There are Many Tricks For Facebook Producing Daily. Nowadays, Peoples are Searching For Tricks About Post To Multiple Facebook Groups, Pages And Walls At Once.
So, I Made A Script From Where You Can Post On All Facebook Groups, Pages, Friends Walls At Once.
So Here Are Complete Tutorial :
You Will See A Connect Button There, Click On That. You Will Be Taken To Facebook Permission Window, Click Allow There.
Then You Will Be Taken To Page Where From You Can Post To Multiple Walls. And You’ll Also See The List Of Pages, Groups And Friends. See The Screenshot…
Facebook
Fill The Post Field As You Like And Select Pages, Groups Or Friends Or Click On Select All.
Now Click On Post And Wait A Minute. You’ll Get Message “Successfully Posted”.
That’s All. If You Have Any Problem Regarding That Than Make A Comment Below.

Saturday, 21 July 2012

Fix Generic volume cannot be stopped right now Problem


This Is A Common Windows Xp Problem And Comes When We Try To Remove Our Pendrive Or Other Removable Media By Selecting"Safely remove hardware".

Many times We Don't Unplug Our Pendrive By Using "Safely Remove Hardware" Feature....But If We Select Safely Remove Hardware Option Then windows Will stop all the read-write operations on the drive so that the drive can be removed..It Is Highly Recommended To Use This Option When You Unplug Your Pendrive.

But Sometimes When We Select "Safely Remove Hardware" Window Give Us A Error Like

"The Device Generic volume cannot be stopped right now. Try stopping the device later "
http://techwarlock.blogspot.in/2012/07/know-how-to-compile-and-run-cc-programs.html
Lets Start To Fix It...


STEP 1: Download A Small Software Named UNLOCKER Unlocker Is a Small Utility Use To Unlock The File Handles Of Your Pendrive Which Is used By Other Applications.

Click Here To Download Unlocker

STEP 2:Install UNLOCKER on Your Computer.

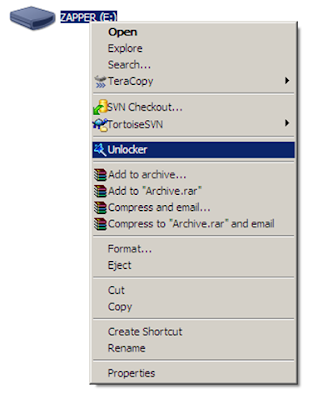
STEP 3:Right Click On USB Drive In My Computer And Select Unlocker.
http://techwarlock.blogspot.in/2012/07/know-how-to-compile-and-run-cc-programs.html
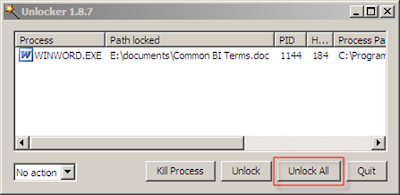
STEP 4:A new Small Window Will Pop-up Which Shows All The Busy File Handles Of File Being Used On Your Pendrive.
http://techwarlock.blogspot.in/2012/07/know-how-to-compile-and-run-cc-programs.html
Click On Unlock All...And Then Try To Remove Your Pendrive...

It Will Not Show You That Error Again..Hope This Helps you :)

Monday, 2 July 2012

How to Delete or Merge existing Disk Partition

In this post i am going to teach you how to delete or merge the existing Disk Partition. I have tried my best to keep the steps as simple and as easy as possible. There is a snapshot provided for each and every small step which would make it itself much self explanatory. 

Step 1: Right Click the ‘My Computer’ icon on the desktop and select the ‘Manage’ option. This will open a Computer Management window as shown below.
manage_thumb8


Step 2: From the list shown on right hand side open ‘Disk Management’. This will show all the current existing Disk Partitions/Drives on your system.

1


Step 3: Now select the partition that you want to merge.
Note: The partition which you want to delete or merge should be empty. And you can only merge the partitions which are side by side ( see the below figure).

1i


Step 4: here I am going to merge partition ‘New Volume’ ( which is empty ) with the partition ‘Ubuntu’. For this, first we need to unallocated the disk space of ‘New Volume’. So, right click on it and select  ‘Delete Volume’

2


Step 5: A new window will open as shown below. Click on YES.

3


Now we have successfully unallocated the disk space that was assigned for ‘New Volume’.

4i


Step 6: Right click the ‘Ubuntu’ partition ( to which you want to merge the partition) and select ‘Extend Volume’. This will open a new window. Keep passing through that window by clicking ‘next’ ( all the windows are self explanatory but still check the snapshots below for a clear understanding).


That’s it. We have successfully merged the disk partition. See the snapshot below.


Thank you for reading. Hope this would help you.
You may also like to read my other related post on How to create a New Disk Partition.

Sunday, 1 July 2012

How to create New Disk Partition without format

One method  to create a new disk partition in your hard disk is through the SETUP process, during the installation of the OS. Other method is, using the Disk Management Process. Disk Management Process is used when we need to create new disk partition or delete existing disk partition after the installation of the OS.  Disk Management Process is much easier to use than Setup Process.

Here i am going to show you how to create a new partition using Disk Management Process. I have tried my best to keep the steps as simple and as easy as possible. There is a snapshot provided for each and every small step which would make it itself much self explanatory.

Step 1:  Right Click the ‘My Computer’ icon on the desktop and select the ‘Manage’ option. This will open a Computer Management window as shown below.
manage

Step 2:  From the list shown on right hand side open ‘Disk Management’. This will show all the current existing Disk Partitions/Drives on your system.

partitions

Step 3: Now select the drive from which you would like to create new partition ( in this i have selected E: with the name ‘Ubuntu’ ). Right click the drive and select ‘shrink volume’. A small process will work for a while and then a new window will open. See the below snapshots.


Step 4: In the new window that popped up, enter the value for how much disk space you want for new partition, and then click ‘Shrink’.
NOTE:  This values are in MB. So if you want a partition of say 10GB then multiply it with 1024 and that would give you the size in MB ( For Eg. 10x1024 = 10240 ).

Step 5:  Now a new partition would be created on your disk as per your mentioned size ( 10GB in our example). But this partition is unallocated and we cannot use it in this form. So, next we will convert it into a Healthy partition so that we can use it the same way like other drives.

4


Step 6: To make it a healthy partition, right click the partition and select ‘New simple volume’. This will open a new window. Keep passing through that window by clicking ‘next’ ( all the windows are self explanatory but still check the snapshots below for a clear understanding).


10


That’s it. You have successfully created a new partition on your disk. See the below snapshot.

11


Thank you for reading. Hope this would help you.
You may also like to read my other related post on How to delete an existing partition.